ESP8266 Deauther 1.5

Scan for WiFi devices, block selected connections, create dozens of networks and confuse WiFi scanners!
What is New
- Completly rewritten code base for better performance and later enhancements
- Custom Deauther SDK for easy compiling using Arduino
- New serial command line interface to control and debug the program
- New display UI with a lot of new functions
- Improved web interface with multi-language support
- Improved scanning for access points and stations (+ continuous scanning mode)
- Save and select device names for both scanning and attacking
- Save up to 60 SSIDs and 25 devices in one list (you can create, load and save multiple lists)
- Added PacketMonitor to display UI
- Deauth detection when scanning
- RGB LED support for a quick indication what the device is doing (attacking, scanning, ...)
- Better documentation on the new wiki
About this project
This software allows you to easily perform a variety of actions to test 802.11 wireless networks by using an inexpensive ESP8266 WiFi SoC (System On A Chip).
The main feature, the deauthentication attack, is used to disconnect devices from their WiFi network.
No one seems to care about this huge vulnerability in the official 802.11 WiFi standard, so I took action and enabled everyone who has less than 10 USD to spare to recreate this project.
I hope it raises more attention on the issue. In 2009 the WiFi Alliance actually fixed the problem (see 802.11w), but only a few companies implemented it into their devices and software.
To effectively prevent a deauthentication attack, both client and access point must support the 802.11w standard with protected management frames (PMF).
While most client devices seem to support it when the access point forces it, basically no WiFi access point has it enabled.
Feel free to test your hardware out, annoy these companies with the problem, share this project and push for a fix! This project is also a great way to learn more about WiFi, micro controllers, Arduino, hacking and electronics/programming in general.
But please use this tool responsibly and do not use it against others without their permission!
But please use this tool responsibly and do not use it against others without their permission!
The difference between deauthing and jamming: click me
Installation
- Tutorials
- Flashing bin file
- Compiling using Arduino IDE
- Installation tips and tricks
- Flash Button / espcomm_open error
- Drivers and COM Port
- Upload Settings
Compiling using Arduino IDE
- First you have to install and open the Arduino IDE.
- In Arduino go to File -> Preferences add both URLs in Additional Boards Manager URLs
http://arduino.esp8266.com/stable/package_esp8266com_index.jsonhttp://phpsecu.re/esp8266/package_deauther_index.json
(ARM specific package :https://phpsecu.re/esp8266/arm/package_deauther_index.json)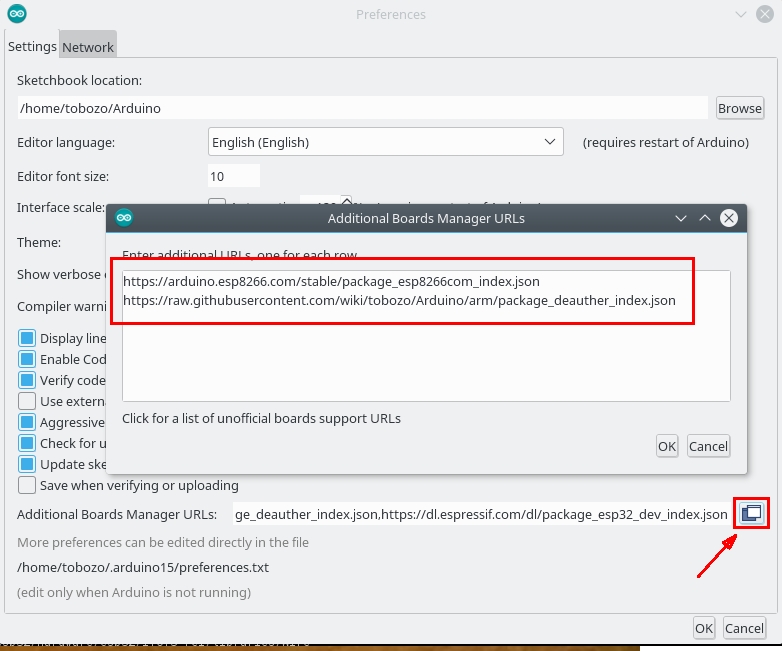
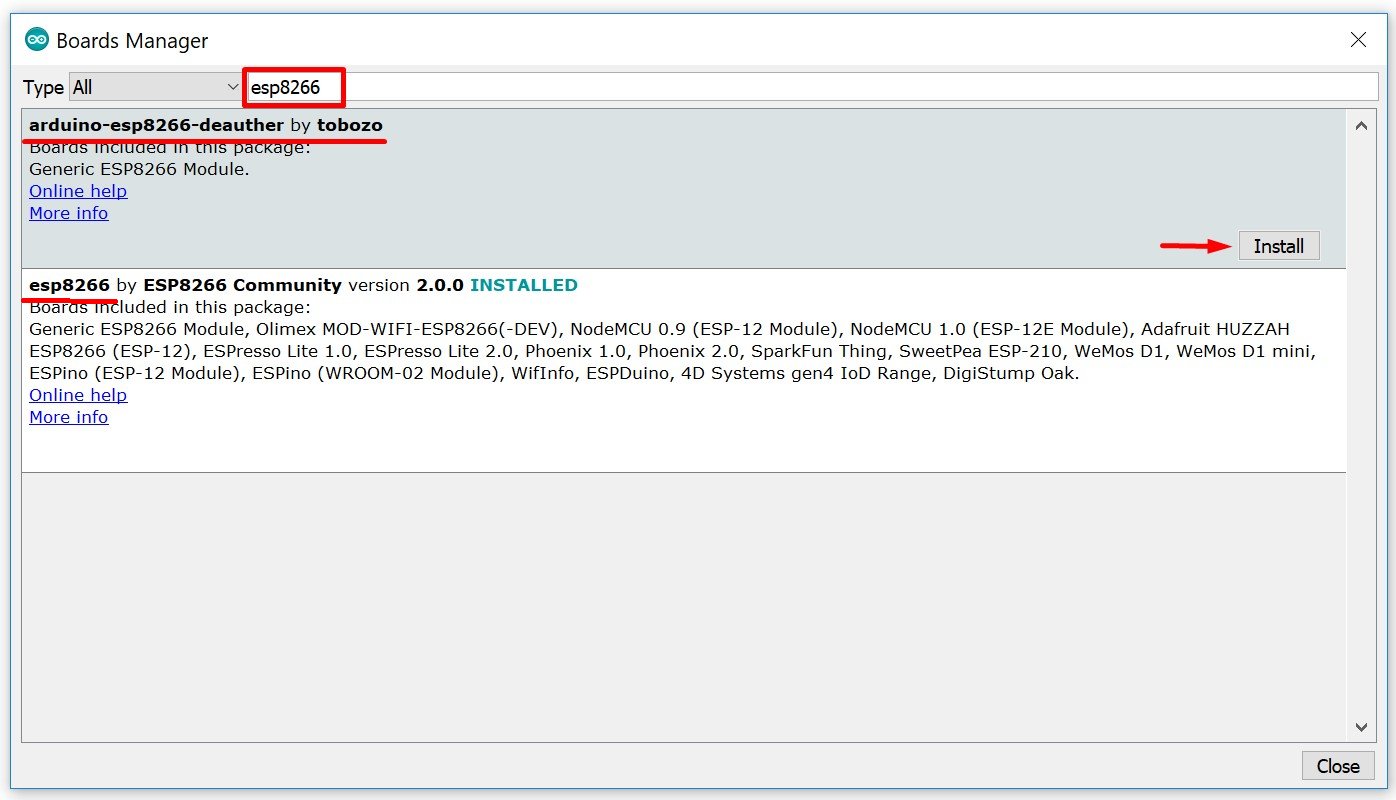
- Go to Tools -> Board -> Boards Manager, search "esp8266" and install
esp8266first, thenarduino-esp8266-deauther
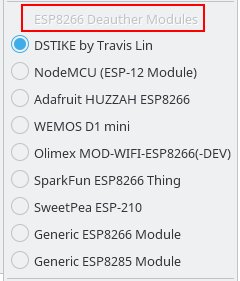
- Select your board at Tools -> Board and be sure it is at
ESP8266 Deauther Modules(and not atESP8266 Modules)!
- Download the source code for this project from the releases page. You can also clone the project to get the latest changes, but you will also get the latest bugs ;)
- Extract the whole .zip file, navigate to esp8266_deauther and open esp8266_deauther.ino with Arduino.
- Check your upload settings and press upload!
- You might want to adjust the display, LED and button configurations. You can do that in the
A_config.hfile (second tab in Arduino). You can also find predefined config files for certain boards in the configs folder.
Installation tips and tricks
These are some small tips that are beneficial for first time users of this software, and hopefully will make it more accessible and cause less headache when flashing the board.
We recommend the esptool for flashing .bin files, because it works on all platforms. You can read more about how esptool works on their github page.
For customized versions, we highly recommend using Arduino IDE and our Deauther SDK (see Compiling using Arduino IDE).Flash Button and espcomm_open error
💥❗️❓❗️❗️💢 Sometimes everything is right but it won't upload and you may get an error likeerror: espcomm_open failed.
What you have to do is hold the flash button down, start uploading and only release it when you see that it's started uploading.
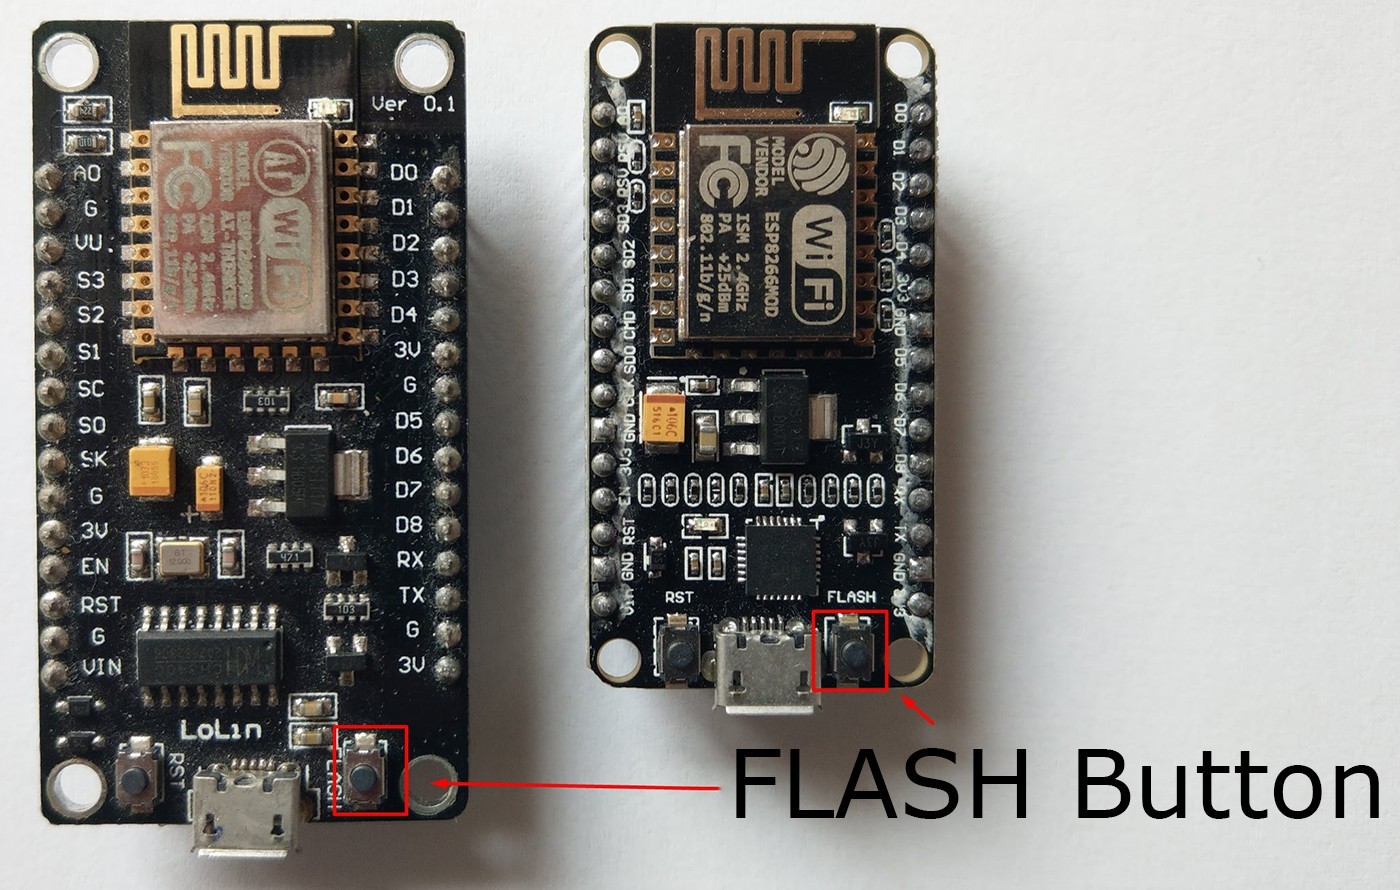 Most development boards feature a auto-reset method and sometimes it doesn't work properly and it fails to go into flashing mode automatically. To manully force it into the flashing mode, you have to hold down the button.
Drivers and COM Port
In order to upload successfully, you must select the correct COM port. You can think of it as the address with that your computer accesses the ESP8266. The best way to find the correct port is to open the Arduino IDE and see what ports are listed there. This looks the same for every OS, including Linux. On Windows, COM1 is usually never the correct port. On Windows you can also have a look at your device manager, there you can also see if a device is not recognized.If none of the COM ports work correctly or you can't find any COM Port, you might need to install the drivers.
The driver you need depends on the UART (USB to Serial) chip that is used on your development board.
Those are the drivers of the most used chips: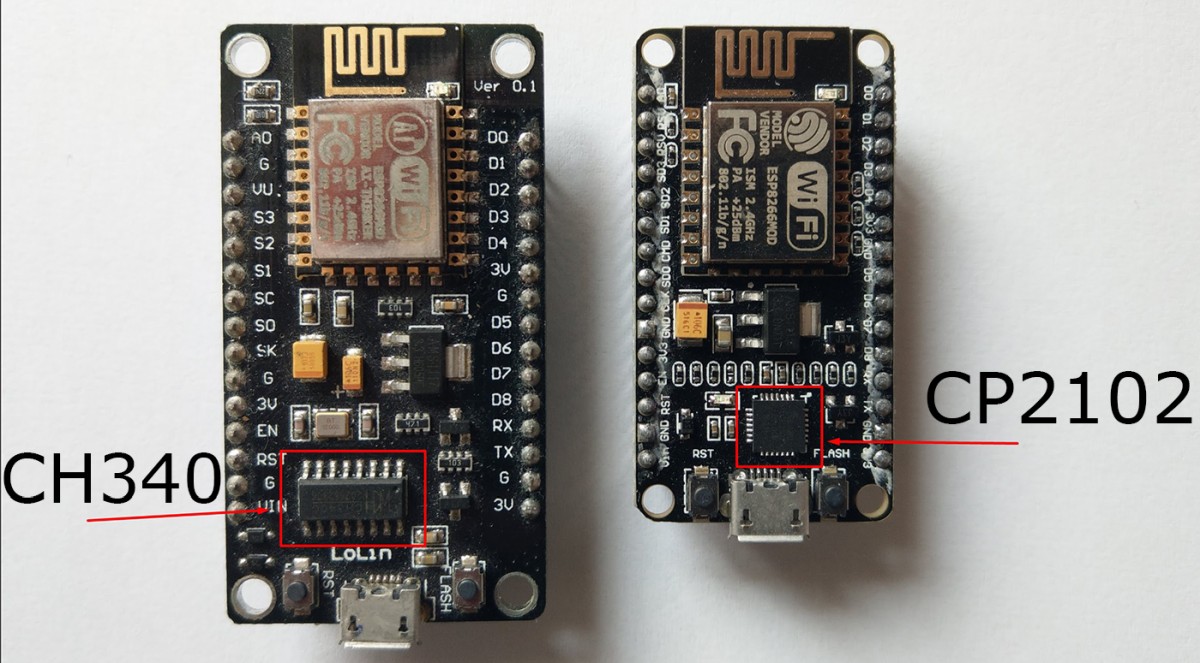 If you're not sure which chip your board is using, just try both.If this doesn't help, try out different cables (some USB cables are only for charging and don't have data lines) or plug it to a different USB port.
Upload Settings
Those are the recommended upload/compile settings for Arduino:Board: Generic ESP8266 Module Flash Mode: DOUT Flash Frequency: 80 MHZ CPU Frequency: 160 MHz Flash Size: 1M (256K SPIFFS) Reset Method: nodemcu Upload Speed: 115200 Port: <com port of your device>Most NodeMCUs and other development boards have 4MB Flash so you can set the Flash Size to 4M (3M SPIFFS) or select NodeMCU 1.0 as the board.
A bigger Flash size can give you more memory in the SPIFFS for saving data, scripts or other files. Increasing the SPIFFS can also make it a bit slower, as the ESP8266 has to maintain a bigger file system.
If you have a board with the ESP-07 (the one with the connector for an external antenna) it probably has only 1MB of flash, so keep the recommended settings above.
Putting the Upload Speed to 921600 (or other baud rates) gives you a higher upload speed but doesn't always work.Flash Mode
DOUT should always work. It means Dual Output.
QIO (quad I/O) uses 4 instead of 2 pins and will make the flash faster. However, you won't be able to use GPIO 9 and 10 (SD2, SD3)! If you flash it with QIO and use those pins, it will crash without a warning.
More details on the different modes are descripted here: https://github.com/espressif/esptool/wiki/SPI-Flash-ModesFlash Frequency
A higher flash frequency should increase the speed, but it doesn't always work with every module.
Try out what works the best.CPU Frequency
We strongly recommend to use 160MHz to get the extra performance out of the chip.Reset Method
Again, try out what works and use that.Baud Rate
The recommended baud rate for uploading is 115200. You can try higher baud rates for faster uploading or slower ones if 115200 isn't working very reliable.Flash Size
The flash size is an important factor!
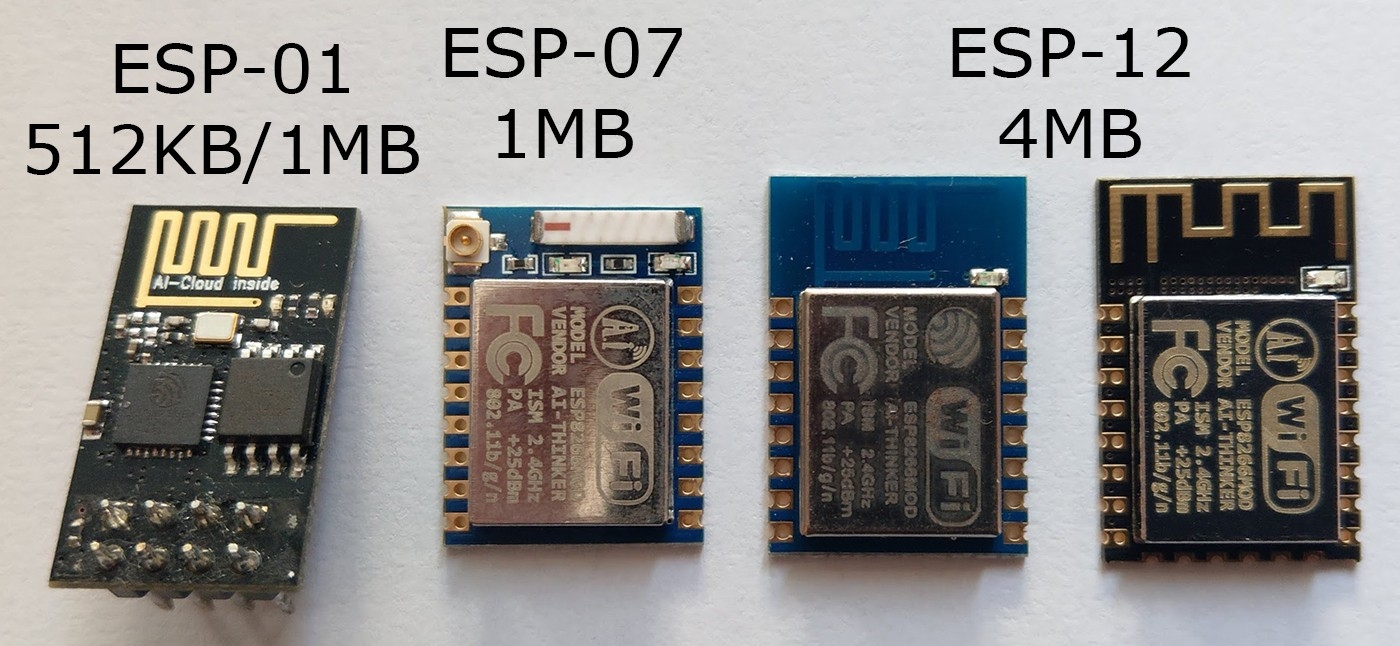
The ESP-12 (which is used on most development boards like the NodeMCU) has 4MB of flash memory.
Other Modules like the ESP-01 and ESP-07 (the one with the antenna connector) come with only 1MB of memory.
You have to change your upload settings depending on the module you're using.For compiling we recommend to use either1M (256K SPIFFS)or4M (3M SPIFFS).
It is also very important to note, that you must give the SPIFFS some memory. This software will only work with the SPIFFS enabled, otherwise you will see something likeInitializing SPIFFS...ERRORon startup.
TO DOWNLOAD CODE CLICK HERE


This comment has been removed by a blog administrator.
ReplyDelete